• Guys, we've spent considerable money converting the Les Paul Forum to this new XenForo platform, and we have ongoing monthly operating expenses. THE "DONATIONS" TAB IS NOW WORKING, AND WE WOULD APPRECIATE ANY DONATIONS YOU CAN MAKE TO KEEP THE LES PAUL FORUM GOING! Thank you!

*** 1952 Les Paul Headstock Repair ***

boogieongtr

Active member
Joined
May 16, 2006
Messages
938
To help pass the time I thought I'd post a headstock repair I did several years ago. Here's a 52 I bought that had the headstock repaired several times in the past. The guitar wouldn't hold tension and snapped off when I tried to tune it up.

4_zpsda74b2f5.jpg


13_zpseacf23e1.jpg


After stripping off the finish you can see the screws and nails and how many times it was glued together.

IMG_9098_zpsaaa9b043.jpg


IMG_9097_zpsc89668b6.jpg


The wood was rotted so I decided to make a new headstock. I came up with a process that would allow me to use jigs and fixtures I have in the shop. The key would be to come up with a way to hold the neck at a 90 degree angle so I could move from machine to machine. I used a 2-1/4" piece of mahogany that we'll call the "sled". You will see how important the sled becomes as I start the process.

IMG_9236_zpsf3574189.jpg


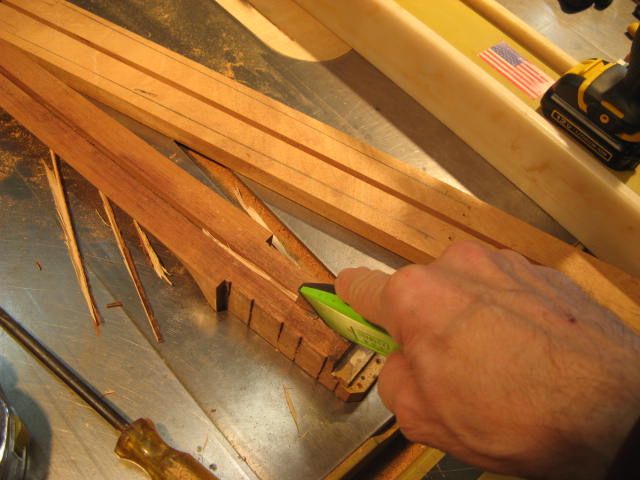
First I used a heat blanket and removed the fingerboard. Next I needed to remove the truss rod. I found center line on the sled and used a 3/16" dado and made the cut leaving solid wood on both ends of the sled so it doesn't collapse. Attach the neck using double sided tape to the sled so I can remove the maple spline to get to the truss rod.

IMG_9222_zps5958e310.jpg


Most of the maple spline is removed.
IMG_9223_zps283e7406.jpg


With a razor blade I'll remove the rest of the maple spline.
IMG_9224_zps6f3fa8aa.jpg


With the maple spline removed the truss rod comes right out.
IMG_9226_zps9484458f.jpg
 

boogieongtr

Active member
Joined
May 16, 2006
Messages
938
I'll use a 17 degree scarf joint (same as headstock angle) which has the most surface area for gluing. First I layout for the cut making sure I'm pass the rotted wood.

IMG_9227_zps835149e1.jpg


Knowing that after I make the cut the sled would collapse I glued a 3/16'" maple spline into the slot making it stick past the surface 1/8" (this will center the old neck to center line of the sled) then make the cut using my headstock angle jig. You can see how the sled is used to hold the face of the neck at a 90 degree angle.

IMG_9230_zpse2572bf4.jpg


Scarf cut made and the sled is in tact to be used on future jigs.

IMG_9231_zps20910917.jpg


'll use another 52 neck to see how thick my headstock blank needs to be and also lay out for rough cut to the headstock blank once it's glued to the neck.

IMG_9232_zps047ad0b1.jpg


I'll do a dry clamp to see how things line up. The neck is still attached to the sled.

IMG_9234_zpsdea0320d.jpg


Next I'll glue the neck to the headstock blank (using hot hide glue) and let it set overnight.

IMG_9235_zpsc785f08c.jpg


Next using the sled with the neck attached I'll make a parallel cut and trim the excess wood on the top side of the headstock. I'll leave the wood about 1/32" strong.

IMG_9237_zps3bbf3835.jpg


Touch it up on my sander

IMG_9239_zps3db56dff.jpg


IMG_9240_zps6cfced94.jpg
 
Last edited:

Aloha_Ark

Active member
Joined
Apr 2, 2020
Messages
154
Eagerly anticipating the next set of pictures. By getting the neck off the body, you kill two birds with one stone- make it easier to replace the headstock, and pave the way to getting the neck angle right.
 

Tubes 'n Wood

Active member
Joined
Nov 9, 2013
Messages
402
I agree with Charlie, these are the best type of threads on the forum... this and how to authenticate fake guitars type.
 

JIMI55LP

Well-known member
Joined
Jun 28, 2005
Messages
1,589
There's nothing better than watching a true craftsman work on a vintage guitar! It inspires me to do more with less fear. Thanks for shareing this repair!
 

boogieongtr

Active member
Joined
May 16, 2006
Messages
938
Next I'll take the fretboard and mark the length and where the angle cut needs to be for the top side of the headstock.

IMG_9242_zps714517cc.jpg


Once again I'll attach the neck to the sled so I can continue to use my jigs.

IMG_9244_zps1c76aa06.jpg


With the correct length of the neck marked I cut the angle to the top side of the headstock. This cut is now parallel to the scarf joint since both cuts were made from the same jig.

IMG_9245_zps8fa04479.jpg


Make the truss rod pocket.

IMG_9247_zps48498f74.jpg


Using the sled I'll slot for the truss rod to the new mahogany.

IMG_9248_zps3af0de99.jpg


Ready for the truss rod.

IMG_9249_zps243e800b.jpg


The original rod fits perfect.

IMG_9254_zpsb427bd6e.jpg
 

marshall1987

Well-known member
Joined
Jan 30, 2005
Messages
3,278
Enjoy seeing a master craftsman restore an old botched neck repair on a vintage Les Paul. :salude

I wonder how many more like this one are out there?

Can you shed some light on this.....:jim

.....I keep seeing a piece of shop equipment called a "Powermatic III" in the photos. What is the Powermatic III and what does it do? Thanks.
 

boogieongtr

Active member
Joined
May 16, 2006
Messages
938
Thanks for the kind words, I'm glad you are enjoying the thread. Yes it's a Powermatic 66 industrial table saw. I've got two vices, old guitars and fine tools. OK moving on.... Next up I'll work on the backside of the neck. First I mark the thickness of the headstock.

IMG_9250_zpsa93acb72.jpg


Using my band saw I make a rough cut removing most of the material.

IMG_9251_zps116187b7.jpg


I use another jig and my overhead router to get the back of the headstock profile.

IMG_9253_zps44d3d12d.jpg


Glue on the headstock wings.

IMG_9255_zps9e4d7290.jpg


Glue in the new maple spline.

IMG_9259_zps92b1d0a5.jpg


Trim the excess maple flush

IMG_9261_zps75eb5415.jpg


I'll make one pass thru my jointer taking off about 1/64". This insures a flat plane when I go to glue the fretboard back onto the neck

IMG_9262_zps5d00a2a6.jpg
 
Last edited:

J.D.

Well-known member
Joined
May 24, 2006
Messages
10,035
Like Charlie, I enjoy these sorts of illustrative threads. I also like to ask questions; not to challenge but to educate myself.

Curious how one makes the decision to graft on a new headstock vs. scratch build a neck in this situation? Seems like it might be an arguably better solution and perhaps not much more work to scratch build a neck. Furthermore, on a '52 the neck joint angle could be corrected in the process.
 

boogieongtr

Active member
Joined
May 16, 2006
Messages
938
Like Charlie, I enjoy these sorts of illustrative threads. I also like to ask questions; not to challenge but to educate myself.

Curious how one makes the decision to graft on a new headstock vs. scratch build a neck in this situation? Seems like it might be an arguably better solution and perhaps not much more work to scratch build a neck. Furthermore, on a '52 the neck joint angle could be corrected in the process.


Valid question. I've built many LP necks and yes it would be one option for this project. For me I wanted to retain as much of the original wood from the neck as possible and also I was looking for a new challenge. Remember in the late 70's early 80's all the thin neck pointy headstock guitars that hit the market? Those guitars had headstocks that were glued on using a scarf joint. It is a very strong joint. I think in the end it would be the customers call. Yes I did correct the neck angle as well.

IMG_9283_zps49edfc51.jpg
 

marshall1987

Well-known member
Joined
Jan 30, 2005
Messages
3,278
Good question. Irrespective of the level of effort involved in this restoration/repair project...my thoughts are along these lines:

... strive to save and preserve as much of the original wood and other parts as possible, within reason. This includes the original Brazilian rosewood fingerboard, truss-rod, etc.

Look at it this way....you are a prospective buyer and looking at two vintage 1952 Les Pauls, both with neck repairs. Guitar A has a non-original replaced neck made from an "old stash" of mahogany, & it has a newer Brazilian Rosewood fingerboard. Guitar B has a repaired neck consisting of a grafted headstock made from the same "old stash" mahogany as in Guitar A, additionally it retains the original Brazilian Rosewood fingerboard & truss-rod.

Aside from the neck repairs both guitars are in very good condition, retain their original parts, and are priced at $15,500 each. Both necks play great and feel nearly identical. Which guitar do you buy? :)
 

samsdad

New member
Joined
Aug 21, 2015
Messages
406
Good question. Irrespective of the level of effort involved in this restoration/repair project...my thoughts are along these lines:

... strive to save and preserve as much of the original wood and other parts as possible, within reason. This includes the original Brazilian rosewood fingerboard, truss-rod, etc.

Look at it this way....you are a prospective buyer and looking at two vintage 1952 Les Pauls, both with neck repairs. Guitar A has a non-original replaced neck made from an "old stash" of mahogany, & it has a newer Brazilian Rosewood fingerboard. Guitar B has a repaired neck consisting of a grafted headstock made from the same "old stash" mahogany as in Guitar A, additionally it retains the original Brazilian Rosewood fingerboard & truss-rod.

Aside from the neck repairs both guitars are in very good condition, retain their original parts, and are priced at $15,500 each. Both necks play great and feel nearly identical. Which guitar do you buy? :)

The Grafted on headstock is much stronger that the original headstock
I had a luthier friend That use to do this exact same repair sadly he died very young
due to a health problem He had a bunch of headstocks all ready made and roughed out and ready and this
was over 30 years ago He used to do a lot of Gibson Grafted on headstocks it was common thing for him
On Gibsons at the time les paul's SG's and even the big body barney kessels and ES style guitars
after he was done it was like it never happened he did it very much like what is being done here
This gentleman has beautiful tools you need good tools to do any quality repairs like this and the knowledge
 

J.D.

Well-known member
Joined
May 24, 2006
Messages
10,035
That's why I ask.

For me personally, I'm not sure quite honestly if I'd prefer one option over the other. Maybe the complete new neck once the original has been removed. Maybe the original neck if the neck pocket joint wasn't broken.

Not my guitar, though, so...
 

boogieongtr

Active member
Joined
May 16, 2006
Messages
938
Next I'll glue on a new veneer to the headstock using a block and clamps to get even pressure. I use a white luthiers glue from LIM. It dries hard and brittle like hide glue.

IMG_9264_zpsfda15fda.jpg


Trim off the excess wood on my bandsaw and screw a template to the headstock. The screws are positioned so they fall inside the Gibson MOP logo and the truss rod cavity and will never bee seen.

IMG_9266_zpsd20afa69.jpg


With a router and a pattern bit I do the final trim cut.

IMG_9267_zps6a2ee047.jpg


With the same pattern I drill for the tuners.

IMG_9268_zpsda940d9f.jpg


The neck is going to get Grovers so I bore out the back the depth of the housing leaving enough wood so in case I want to use Klusons the ferrules will fit. Grover tuner fits nice and snug. Also the top of the headstock will get the final profile a bit later.

IMG_9278_zpsa1fe5d60.jpg


Time to strip off the old finish

IMG_9286_zps7b779b87.jpg


Dry fit of fingerboard.

IMG_9302_zps49aa8f03.jpg


I use hot hide glue to attach the fingerboard. An aluminum beam with a 12" radius applies even pressure. I'll leave the clamps on overnight.

IMG_9305_zpsdcf2489a.jpg
 

boogieongtr

Active member
Joined
May 16, 2006
Messages
938
While I'm working on the back profile I'll take an iron and a wet rag and steam out most of the dents.

IMG_9310_zps5ef9dce6.jpg


Getting close to completion but still a couple things left to do. I'll remove most of the mahogany with my sander at the lower part of the headstock.

IMG_9306_zpsddcf11ae.jpg


I'll do the final profile by hand using a rasp, files & sand blocks.

IMG_9311_zps4124cf6a.jpg


Ready for the MOP logo. I position and route out for the logo.

IMG_9317_zps4ec400d2.jpg


I route out for the MOP logo glue it in and fill the gaps with resin filler with black tint.

IMG_9318_zpse33f294e.jpg


Sand the filler flush.

IMG_9322_zps127767fc.jpg
 
Top