• Guys, we've spent considerable money converting the Les Paul Forum to this new XenForo platform, and we have ongoing monthly operating expenses. THE "DONATIONS" TAB IS NOW WORKING, AND WE WOULD APPRECIATE ANY DONATIONS YOU CAN MAKE TO KEEP THE LES PAUL FORUM GOING! Thank you!

1996 Studio Refinish Log w Pics.

Hotshot

Member
Joined
Jul 25, 2017
Messages
282
Thought it might be fun to document my first attempt at doing a refin on my 96 Studio. Ill add as I go.

I got it for a very good price. It plays nice, had P94s in it and was beat to hell. Only thing I hated was the Wine red.

I put Zebras in it that were from my Trad. Then I dulled up the hardware as it was anodized all black ( after market ).

After seeing some posts on here and never being able to sit still I decided I'd strip it. Thx to Instagram I got some amazing help from Chelsea at Guitars and Caffeine. Check her out, she does amazing work.

I have woodworking knowledge, and airbrushing skills, but still consider myself a novice and this. Just ask the right questions go slow and listen...What could go wrong...

Im going to attempt a faded burst. It will be done with aniline dyes and Nitro, like they did in the 50s and still do.

I live north of the border so Stewmac stuff isn't the easiest to get. here goes.


i-Btm8Nfw-L.jpg


The start.

i-DBdTTvT-L.jpg


After I stripped the Nitro off with Acetone and plastic razorblades. Its a mess. What you see here is Black wood filler. You need wood filler if you want a smooth glass finish. If not the grain rises and it feels bumpy. See those 6-800$ SGs of faded models of late.

i-vpv9CQF-L.jpg


Sand more with 320 & 400, use more acetone and you get this. You'll noticed i goofed and some ran down the maple. Needs to be cleaned but Pain in the Butt.


i-nq3dx4z-M.jpg


The Mahogany looks great.

i-q8vqqTg-M.jpg


This is Aniline Dye, and Filler. Had to buy it in industrial quantities. 2oz min dye. Lets just say I have enough for a bedroom set.

Goudey is the real deal up here. They make Lacquer. I showed up not really knowing anything, but brought pics and the guitar. A very nice man grabbed a piece of Mahogany and started showing me whats what. What you see below is the dye mixed with Methyl Alcohol, then the Filler wiped off with cheese cloth, then he shot a clear spray lacquer over it. I cant stress the importance of filler even on a already filled guitar. Looks great.

i-SXgvrQn-L.jpg


i-6rdxr83-XL.jpg


This is after the dye and the filler. Now to let it dry over night.

I will lightly sane this.

Up next is the top. Im not sure how i want to do it. Part of me wants to pre stain the maple with the amber. The other part wants to spray a clear coat as a sealer and then float the colour on the next layer....

Also, some bleeding occurs from Mahogany to maple. I Have you figure out if i Fake binding it with paint or what will look best. Stay tuned...

i-FFCLc9s-L.jpg
 

Hotshot

Member
Joined
Jul 25, 2017
Messages
282
Re: 1996 Studio Refinish Log w Pics. Spray time

Hi Guys,

So an update.

Had a break in the weather up here in Canada. It got above freezing and the humidity was low. You need Low humidity for Nitro, and above freezing for the Gun to atomize properly. With Nitro being so toxic, its a spray outside in the well ventilated large type project. I do after its off gassed for a bit bring it in to dry / hang. Also, my materials are only outside for a very short application time, thus they are warm.

First Up was spray a sealer coat of Lacquer on the wood. I did 3 base / sealer coats.

i-j9JzB6T-L.jpg
i-6ZsrPDG-L.jpg


After it dried i hung it for 4 days. Then it was onto colours.

First up a tinted amber base.

i-HwktN8H-L.jpg


The slight orange peel is ok as this is just between coats and wet.

Next up was some red tint.

i-3F5KMrG-L.jpg


At this point I felt i needed some brown / Cherry mixed in for a shadow coat..

i-N2d8LTZ-L.jpg


Now I had 2 runs, plus i felt i went to high on the bottom with the red. Also, I need the sides to have a more purple hue. But, lets not rush. Time to wet sand out the imperfections with 800, and let cure a bit.

i-bs59Mc3-L.jpg


This is after the ending and where we are now. I have my Lacquers mixed and ready. Waiting on weather.

i-CCkLk67-L.jpg


The plan now is, a soft amber and the purple shadow layer, blended in with the cherry. Then the whole guitar gets a light tint of amber. After that its Gloss Gloss Gloss coats. 3 a day, let stand a week. Then, after 9 coats, leave for a month before the Buff wheel.

I have ordered Cream rings and parts from Gibson as I am not fond of black on a burst.

Stay Tuned,
 

Attachments

  • i-j9JzB6T-M.jpg
    i-j9JzB6T-M.jpg
    35.5 KB · Views: 9

Zentar

New member
Joined
Oct 1, 2011
Messages
830
All your hard work shows. Well done. Studios are great to mod. I'd be terrified to touch my Standard but I've done all kinds of stuff to my 06 Studio. Not as fancy as you though.
The only thing I want to do now to my Studio is 500k pots. It came with 300k
 

Hotshot

Member
Joined
Jul 25, 2017
Messages
282
All your hard work shows. Well done. Studios are great to mod. I'd be terrified to touch my Standard but I've done all kinds of stuff to my 06 Studio. Not as fancy as you though.
The only thing I want to do now to my Studio is 500k pots. It came with 300k


Mine has 500s. Percent simple mod. Honestly, If I learned one thing, it’s that I’d rather do a standard. The lack of binding is a major pain. With binding you get to cover up and bleeding and just scrape.

With out, I’m constantly thinking on what to do. If I mess up I’ll have to relic it just to look decent.

Also, there’s still a wee colour bleed from the filler to the maple. Now I see why they used binding. Lol.
 

Mudman

New member
Joined
Dec 9, 2006
Messages
87
Looks great! Thanks for sharing the process. Fun to see.
 

Hotshot

Member
Joined
Jul 25, 2017
Messages
282
Thx Guys. Just need to warm up a bit. Im spraying in my Garage and -10C will not play nice with a gun or Nitro.... On a side note i picked up my Cream Gibson Parts today an did a little neck work.. Stay tuned..
 

Hotshot

Member
Joined
Jul 25, 2017
Messages
282
Colour coat complete. Happy with turn out.

Hi all, I’m on the road again but wanted to give you an update. I’m using the direct pic uplink so they will be small. I’ll edit it when I get to my PC.

49D26A6E-4FC7-4596-B76F-CA004DDC1EE0.jpg

It it warmed up just above freezing and low humidity so I was able to spray the second round of colour.

After messing up up the first coat ( got a run because I messed up ) and some blushing, I was able to fix all.

I read an an old post where some one said to wipe a some thinner with a rag over the blushing. I tried it and yes it worked perfectly. blushing gone. Some minor streaks but the next coat gets rid of that.

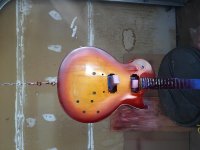
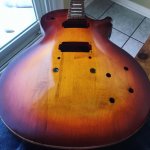
So so here’s the colour after I fixed the mess ups and covered over where I sanded too deep.

A5D1B78D-B9E2-4801-B790-C634F856E961.jpg 4E7C6D36-652E-4169-89AF-92FB2E6F9823.jpg FEF4D846-4E33-479B-BC4D-6D9583FC2A47.jpg


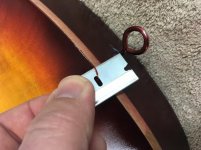
I used a blade to give a little faux binding.

73F74145-35B0-49BF-A1A2-4834819677D1.jpg

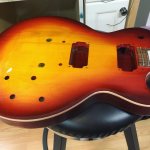
With the shop shop lights right on it.


Next up up I will spray a light amber coat over the whole thing. Then a bunch of gloss coats. Let cure a month and buff.
 

grimlyflick

Well-known member
Joined
Oct 27, 2005
Messages
1,277
Looks great, I can’t wait to see this finished.

I used to have a black 60’s Tribute that was scraped for faux binding and then clear coated but this is another level. I’d like a guitar like this in the future as I like the feel of an unbound neck.

Nice work.
:salude
 

Hotshot

Member
Joined
Jul 25, 2017
Messages
282
All the Top Coats Done. Now we wait till it cures.

Just finished the 11th coat. Time to Harden. Their its wet sanding and buff time.

i-PNw4QJ8-L.jpg


i-2nM6Lvd-L.jpg
i-Xj4gX26-L.jpg


i-8zJ7xFc-L.jpg


All in all only a few blunders along the way. 600-800-1000-1200-2000grit is next.
 

Hotshot

Member
Joined
Jul 25, 2017
Messages
282
And she's Done. Final Pics

She's done!

i-8bQj7ds-L.jpg


i-p45JhNG-L.jpg


After 12 coats of Nitro and 3.5 weeks to cure, i started wet sanding. 800-1000-1200-1500-2000 grit.

i-DQcddbH-L.jpg


Then, after looking at lots of youtube and talking to some Luthiers, I decided to Drill Buff as i don't have a Pro Buffer.

I used TurtleWAx ( calm down ) SILICON free compounds of 2 grits. Then Mguires PlastX ( again No silicon, i called the company).

i-HnZmCfZ-L.jpg
i-9cFz4w9-L.jpg


Sanding down the Historic Rings to match the curve.

i-VLtmGgZ-L.jpg


I am happy how it turned out, as i was going for a slightly playing look. You can see some scratches if you really eyeball it close. I think i would have started at 1000 next time.

i-bsRfxGN-L.jpg


My Luthier friend will let me use his 14" Buffer when i go see him. What the heck, ill give it a shot.

I love the Bourbon Bursts, and I'm pleased with my one shot first attempt.

Doing this wasn't cheap. I'm in for $170 in Materials ( the dyes and wood filler where the most ) and $150 for a lot of new hardware. To the touch both guitars feels the same.


Heres some pics. Thx to the guys on here who helped me out.

i-FBsT8PS-L.jpg


i-98rdVSh-L.jpg
 

Zentar

New member
Joined
Oct 1, 2011
Messages
830
Well done. I like the finish. I can't believe you did so much sanding. Lowes sandpaper ain't cheap. I did a 20 coat Walnut rifle stock once that wore me out but rifle stocks are easier than guitars.

I read where the Chinese would put on 100 coats of Tung oil on bowls. It is astounding what multi coatings reveal.

I see you're in Canada. Did you have issues getting Nitro to dry in Winter?
 

Hotshot

Member
Joined
Jul 25, 2017
Messages
282
Well done. I like the finish. I can't believe you did so much sanding. Lowes sandpaper ain't cheap. I did a 20 coat Walnut rifle stock once that wore me out but rifle stocks are easier than guitars.

I read where the Chinese would put on 100 coats of Tung oil on bowls. It is astounding what multi coatings reveal.

I see you're in Canada. Did you have issues getting Nitro to dry in Winter?

Not at all. I waited for days above freezing to spray. Say 2-10c. The gun being too cold was the biggest issue.

Id mix 3:1 nitro and shoot 3 coats a day. After it off gassed outside, I’d bring it in at night. And leave it for a few days.

If I got a run, I’d leave it dry and sand it.

$50 on sand paper..
 

Wilko

All Access/Backstage Pass
Joined
Mar 11, 2002
Messages
20,867
Awesome project, and great work! :salude
 
Top